
本記事ではNginxでサブディレクトリを活用して、アクセスされたらそれぞれ異なるWebサーバーに振り分ける手順を解説する。
前提条件
本記事では以下の環境を前提としている。
| Linux 環境 | |
| OS | Debian GNU/Linux 12 (bookworm) |
| ミドルウェア | nginx(1.25.5) |
| Nginx.confファイルのパス | /etc/nginx/nginx.conf |
| Webサーバー1のドメイン | http://front.libproc.com |
| IPアドレス | 57.180.13.226 |
| Webサーバー2のドメイン | http://main.libproc.com |
| IPアドレス | 52.69.161.215 |
<構成図>
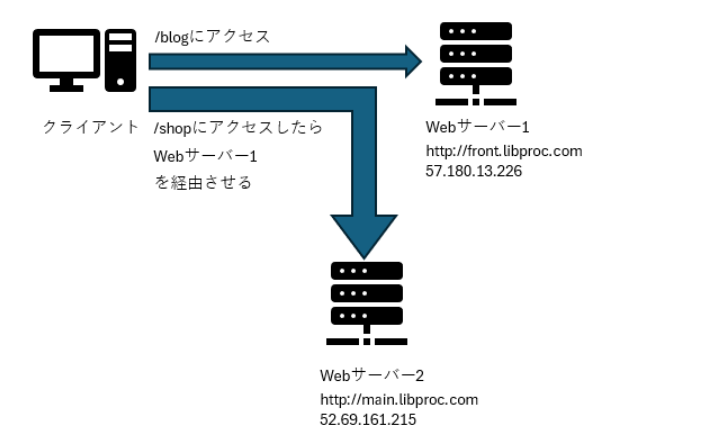
Nginxの設定方法
以下の手順でNginxの設定をする。/blogと/shopのリクエストを処理する。
http://front.libproc.com/shopにアクセスがあったらhttp://main.libproc.comにアクセスする。
1. [Webサーバー1]サブディレクトリの作成
Webサーバー1の/shopにアクセスがあったら、Webサーバー2でリクエストを処理する。
ユーザー側からはWebサーバー1にアクセスしているが、処理しているサーバーはWebサーバー2という状態を作る。
ルートディレクトリ /usr/share/nginx/html 配下にサブディレクトリ/blog , /shopを作る場合で考える。
以下のサブディレクトリを作成する。
# sudo mkdir /usr/share/nginx/html/blog
# sudo mkdir /usr/share/nginx/htmlshop
htmlファイルを準備する。
# cd /usr/share/nginx/html/blog
# sudo vi index.html
shopディレクトリには以下のindex.htmlを準備。
# cd /usr/share/nginx/html/shop
# sudo vi index.html
以下を追加して保存する。
<h1>Welcome to Blog page</h1>2. [Webサーバー1]Nginx設定ファイルの編集
Webサーバー1側のNginxの設定ファイル(nginx.conf)を編集する。
以下のように、リバースプロキシの設定を追加する。
この設定では、Nginxがリクエストを受け取り、http://front.libproc.com/shop/へのアクセスをWebサーバー2(http://main.libproc.com)に転送している。
server {
    listen 80;
    server_name front.libproc.com;
    location /blog/ {
        root /usr/share/nginx/html;
        index index.html;
    }

    location /shop/ {
        proxy_pass http://main.libproc.com;
        proxy_set_header Host $host;
        proxy_set_header X-Real-IP $remote_addr;
        proxy_set_header X-Forwarded-For $proxy_add_x_forwarded_for;
        proxy_set_header X-Forwarded-Proto $scheme;
    }
}
<各ディレクティブの説明>
| location /shop/ | shopディレクトリへのリクエストがきた場合、Webサーバーに転送 |
| proxy_pass | リクエストを転送するWebサーバー(Nginx)のURLを指定 |
| proxy_set_header | Webサーバー(Nginx)に転送する際のHTTPヘッダーを設定 |
| Host | クライアントがリクエストしたホスト名を設定 |
| X-Real-IP | クライアントのIPアドレスを設定 |
| X-Forwarded-For | クライアントのIPアドレスをリスト形式で設定 |
| X-Forwarded-Proto | クライアントが使用したプロトコル(HTTPまたはHTTPS)を設定 |
<各変数の説明>
| $host | クライアントがリクエストしたホスト名 |
| $remote_addr | Nginxが受け取ったリクエストのクライアントIPアドレス |
| $proxy_add_x_forwarded_for | 現在のクライアントIPアドレスをX-Forwarded-Forヘッダーに追加 |
| $scheme | クライアントリクエストのプロトコル |
3. [Webサーバー1]設定のテストとリロード
設定が正しいかどうかをテストし、Nginxをリロードする。
# sudo nginx -t問題がなければ以下のように出力される。
nginx: the configuration file /opt/bitnami/nginx/conf/nginx.conf syntax is ok
nginx: configuration file /opt/bitnami/nginx/conf/nginx.conf test is successful
Nginxをリロードする。
# sudo systemctl reload nginx4.[Webサーバー2]nginxの設定を変更
/etc/nginx/nginx.confを修正する。
server {
    listen 80;
    server_name main.libproc.com;

    location /shop/ {
        root /usr/share/nginx/html;
        index index.html;
    }
    location /blog/ {
        root /usr/share/nginx/html;
        index index.html;
    }
}
Webサーバー1同様、設定のテストとリロードを行う。
# sudo nginx -t
# sudo systemctl reload nginx
5.検証
Webサーバー1(http://front.libproc.com/shop)にブラウザからアクセスして、Webサーバー2(http://main.libproc.com/shop)のコンテンツが表示されるか確認する。
<表示される内容>

<Webサーバー1側(/shop)(57.180.13.226)のaccess.log>
220.81.75.157 - - [11/Sep/2024:10:54:08 +0000] "GET /shop/ HTTP/1.1" 200 409 "-"
"Mozilla/5.0 (Windows NT 10.0; Win64; x64) AppleWebKit/537.36 (KHTML, like Gecko)
Chrome/128.0.0.0 Safari/537.36 Edg/128.0.0.0" "-"
<Webサーバー2側(/blog)(52.69.161.215)のaccess.log>
57.180.13.226 - - [11/Sep/2024:10:54:08 +0000] "GET / HTTP/1.0" 200 615 "-"
"Mozilla/5.0 (Windows NT 10.0; Win64; x64) AppleWebKit/537.36 (KHTML, like Gecko)
Chrome/128.0.0.0 Safari/537.36 Edg/128.0.0.0" "220.81.75.157"
リクエストが発生した日時が、リバースプロキシサーバー、Webサーバーとも「11/Sep/2024:10:54:08 +0000」で同じとなっている。
また、Webサーバー側にアクセスしたクライアントのIPアドレスが「57.180.13.226」で、リバースプロキシサーバーのIPアドレスとなっているので、リバースプロキシサーバー経由でのアクセスであることが確認できる。
- Nginxのログフォーマット設定と出力ログの見方を解説
- Nginxを再起動前にコマンドで文法チェックや設定誤りを確認をする方法
- [Nginx]オレオレCA認証局でSSL通信をする手順。サーバ証明書・秘密鍵・証明書署名要求の作成方法
- [Nginx]オレオレCA認証局を利用したクライアント証明書通信をする手順
- Nginxのログ一覧・ログ設定・ログ出力先の確認・設定方法を解説
- NginxでBasic認証の設定する方法
- Nginxの設定ファイル(.conf)の書き方と設定方法
- Nginxでリバースプロキシの構築・設定方法
- NginxでSSL設定してHTTPS通信をする手順
- NginxのVirtualhostを使って1つのサーバーでサブドメインを公開する手順
- [Nginx] サブディレクトリのアクセスを異なるWebサーバーにアクセスを振り分ける方法
